Types of Picture Postcard
Two basic types of picture postcard can be usefully distinguished:
A) REAL PHOTOGRAPHICS (often called "RPs" by postcard collectors) are true photographs printed onto thin card instead of the usual photographic paper. Light is projected through the negative onto the card's light sensitive surface, which darkens according to how much light reaches it. As soon as the picture is judged to be sufficiently "developed", the surface is rinsed in a chemical solution ("fixed") to prevent further darkening.
Real photographic postcards offer pictures of high clarity and definition, provided the surfaces have been fixed properly and have not suffered significantly from fading. Even quite badly faded photographs, however, can often be successfully scanned, then recreated by adjusting the contrast and brightness of the scanned image.
Many postcard publishers, particularly before the First World War, printed real photographic cards by hand one after another, on a simple production line basis. It costs much the same per card to produce 500 real photographics as 50 because the start-up costs are minimal - in many cases only the cost of the negative. However, producing cards one by one becomes impractical if there is heavy demand. The bigger publishers, like Judges of Hastings, catered to the mass market by buying special machines that could print large numbers of cards at a time onto big sheets of card, which could then be guillotined to create the individual cards. Such machines were expensive, and could be afforded only by really large-scale publishers.
Real photographic cards are preferred by collectors because of their high definition and surface lustre.
B) PRINTED CARDS, in contrast to real photographics, are created using black or coloured ink. The term "printed" is too well established to be changed, but is ill chosen as real photographics can also be properly described as printed, even though the process is entirely photographic and no printer's ink is used.
Various processes have been used to print picture postcards:
1) The earliest process of colour printing for postcards was CHROMO-LITHOGRAPHY, which in expert hands was capable of producing outstanding results. Traditionally, flat surfaced slabs of lithographic stone were used. Wax was applied to the areas of the stone surface intended to receive a particular colour; the rest of the surface was allowed to absorb water. When oily ink of the chosen colour was spread on the stone surface it adhered to the waxed areas but not the rest of the surface because the water repelled the ink. By pressing a card against the stone in a printing press, the ink could be transferred to the card. Separate stones had to be used to transfer each colour, and great care had to be taken to ensure that with each pressing the stones were correctly positioned, otherwise problems of "registration" (blurring) occurred.
Chromo-lithograph cards can be recognised by their delicate yet vivid colours. When an unvarnished card is tilted at different angles to the light, the individual colours stand out in turn, because they reflect the light differently. However, if the picture surface of the card is varnished, the play of colours is less obvious. Over time the varnish tends to deteriorate and its surface becomes crazed.
Chromo-lithography was soon abandoned as a process of printing cards because it was too expensive.
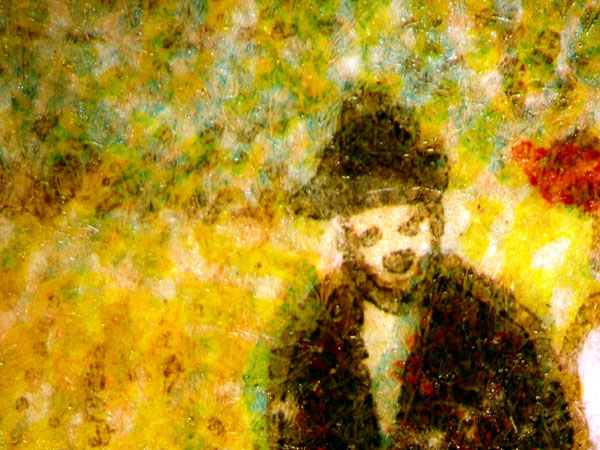
Chromo-lithography - highly magnified portion of the court card of Worthing illustrated in the "Picture Postcard History" section.
2) Still in widespread use today is the confusingly named HALFTONE PROCESS, which converts an original photograph into an array of equi-spaced round dots. In the lighter areas of the picture the dots are black (coloured in the case of a coloured picture) on a white background, whereas in the darker areas they are white on a black (or coloured) background. When the dots are viewed from a distance, they appear to merge and the eye is tricked into seeing a grey tone (or a particular level of colour), the amount depending on the size of the dots relative to the background. By making the black dots larger the grey tone can by darkened until mid grey (equivalent to a mix of 50% black and 50% white) is reached, when the dots fuse, creating a pattern of alternating black and white squares. Likewise, by shrinking the size of the white dots in the darker areas of the picture, grey tones from 50% upwards can be created. Full black is attained by making the white dots vanishingly small.
The traditional method of creating halftone dot arrays is to use a screen (usually a sheet of glass) with a finely ruled grid of lines. Light from the photograph to be copied is passed through the screen, which breaks it up into the required array of dots. The dot spacing is determined by the closeness of the lines on the grid. Nowadays, dot arrays are often created digitally using a scanner and a computer, without recourse to a gridded screen.
In order to print a halftone picture, the dot array has to be transferred to the surface of a metal plate or other stable medium (the printer's "block"). Many different methods of transfer have been devised. One of the simplest is to etch the surface of the plate using acid. The black dots and black background areas are left upstanding, while the white dots and areas of white background are recessed below the surface. The upstanding areas are then inked by rollers, leaving the recessed areas ink free. When card or paper is brought into contact with the plate in a printing press, the ink is transferred, creating the halftone picture. Colour pictures can be created using multiple plates (at least three, one for each primary colour) and making separate pressings.
Halftone printing rates are fast and very large numbers of cards can be made quickly and cheaply. Unfortunately, screening degrades the image. Definition is inferior to that of real photographic cards, and, when halftones are scanned, they often give rise to interference (moiré) patterns.
Halftone cards are economic only if they can be sold in reasonably large numbers. Start-up costs are relatively high, but once these have been recovered, extra cards can be printed very cheaply.
Cards that have been printed by the traditional halftone process can be easily identified using a pocket magnifying glass. When enlarged, the black and white pictures break up into a mass of dots, arranged in columns and rows, usually set at 45 degrees to the horizontal. The spacing of the dots is determined by the number of lines per millimeter of the halftone screen, typically about 8-10. Fine screens yield a better quality of reproduction than coarse ones. Colour printed cards often show a "rosette" pattern of dots under magnification.
A drawback with using screens to generate halftone images is that the dots are always equi-spaced. Digital processing allows the dots to be positioned more randomly, reducing the problem of moiré patterns.
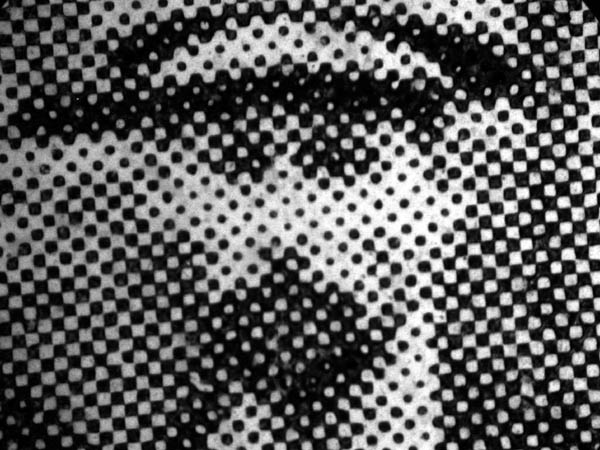
Portion of a halftone card showing a man's face at high magnification. On the original card the rows of dots are about 0.125mm apart
2) An important variant of the halftone process is known as PHOTOGRAVURE. A screen is again used, but the parts of the picture to be printed are recessed into the metal plate, not left upstanding. This reverse method of etching is called INTAGLIO. Each dot is represented by a cell or tiny well in the surface of the plate, whose depth controls the degree of greyness or blackness of the dot. The cells are filled with ink, the surface of the plate is wiped clean, and then card or paper is pressed against the plate to draw up ink from the cells. Deep cells yield more ink than shallow cells, producing darker tones.
Photogravure shares many of the advantages and disadvantages of halftone printing. It is fast, but economic only for long print runs because the plates are quite costly to make. It gives a more continuous range of tone than the halftone process, often imparting a silky sheen to the picture. When viewed under a magnifying glass, cards printed by photogravure have a distinct warp and weft texture, as if composed of finely woven muslin. In between the warp and weft lines are dark dots whose size varies across the picture creating differences in tone.
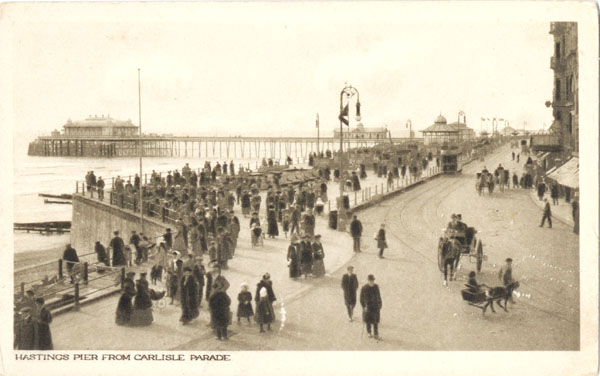
Photogravure card of Hastings with well printed grey tones published by Boots (Nottingham)
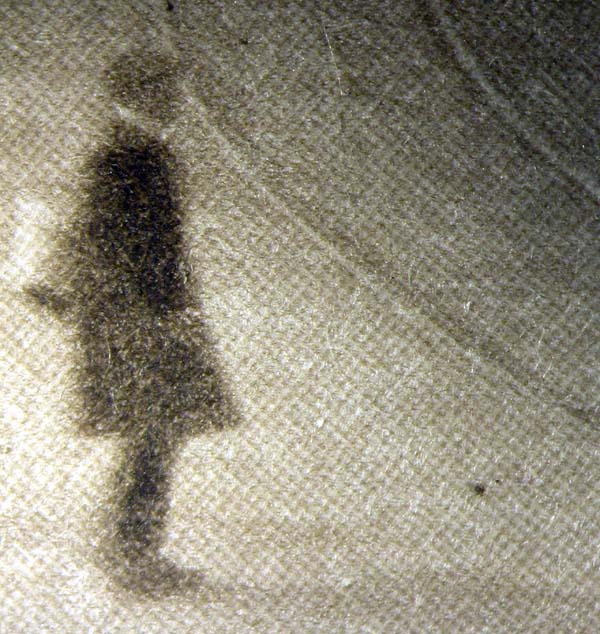
Close up of part of the preceding card showing the man standing near the tram lines. Note the "warp and weft" pattern characteristic of photogravure printing. The lines are about 0.14mm apart.
3) The COLLOTYPE PROCESS produces printed pictures without the use of screens, unlike the halftone and photogravure processes. A glass or metal plate is coated with gelatine that is made light sensitive by the addition of potassium or ammonium dichromate. The surface of the gelatine is exposed to light passing through the negative and hardens unevenly according to the amount of light it receives. Bright areas of the negative (corresponding to the dark parts of the photograph) let through the most light and cause most surface hardening. When first water and then printers' ink are spread on the exposed surface of the gelatine, the less hardened parts (representing the lighter areas of the photograph) retain more water and attract less ink than the more hardened parts (representing the darker areas of the photograph), which retain the least water and thus most ink. When the inked surface of the plate is pressed against a piece of card or paper, ink is transferred, creating the picture.
Collotype printing in expert hands can produce high quality reproductions of photographs. Unfortunately, printing rates are slow, and the gelatine surfaces yield only a few thousand prints before becoming unacceptably worn. Before the First World War, collotype printing was commonplace, but in the interwar period it was used less often because it required a skilled labour force and was costly. Nowadays it is very rarely used in picture reproduction, having lost out to the halftone process and modern ink-jet methods of printing, which are easier to automate. Attempts at revival have had only temporary success, and the process is now considered to be no longer commercially viable.
Collotype cards can be easily identified if examined under a powerful magnifying glass. Before the gelatine coating is exposed to light it is first heated in an oven, which causes the surface to develop very tiny reticulations or polgons, which can be readily seen (unless the collotype plate used in the printing was badly worn), particularly in the paler areas of the picture, at X10 or greater magnification. Individual polygons vary in size, but are typically around 0.10-0.15 mm across. Because the micro-pattern is somewhat irregular, it does not usually create moiré patterns when the card is scanned.
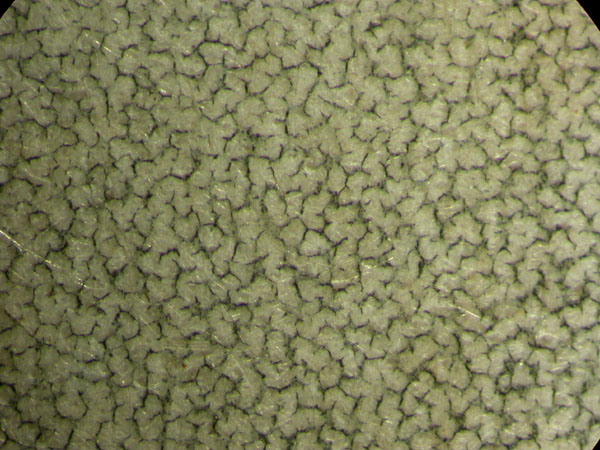
Portion of a collotype card under high magnification showing the characteristic polygonal patterning. Individual polygons are 0.10 to 0.15 mm across